Here we cover a few options you have to backup and restore your GrapheneOS Ghost Phone or Tablet device.
To ensure the safety of your device and its contents, it’s crucial to perform regular backups and have a strategy for restoring your data in case of loss or damage. To this end, performing backups without knowing how to recover your data if/when needed is useless! This same logic applies to your laptops… but we’re focused on phones and tablets here, so let’s dive in.
When running GrapheneOS (the operating system on your Ghost Phone and Tablet) your data is no longer being uploaded constantly to Google or Apple’s servers. This is great from a privacy perspective but creates an issue should you lose your device, damage your device, or the device for whatever reasons simply stops working because you can’t simply retrieve everything “from the cloud” by getting a new device and entering your Google or Apple login credentials.
Thankfully, you’ve still got options.
1. GrapheneOS Backup
How It Works:
GrapheneOS offers a built-in backup tool called Seedvault that allows you to back up your apps, settings, and data.
What is Seedvault?
SeedVault is an independent, open-source data backup and restore application for Android and derived mobile operating systems. It provides users with maximum data privacy and resilience by storing their data in a location they choose, using client-side encryption to protect backed-up data. It is also the default Backup application GrapheneOS currently uses on their devices.
Seedvault thus = the Backup Application used on your device.
What You Can Back Up:
- Apps and app data (for apps that support backup)
- Device settings
- Files and photos (via user-managed file backup)
Steps to Set Up:
1st Time Backup or New USBC Thumbdrive for Backup
If you just received your device and have NEVER performed a backup yet, and/or you are using a new USBC storage thumbdrive to perform a backup, you will need to do the following first:
- Open Settings on your device.
- In the Search field, type “seedvault”
- Tap on “Seedvault App Info“
- Tap on “Storage & cache”
- Tap on “Clear storage”
NOT doing the above means when you go to Settings > System > Backup, as outlined below, the Backup and Restore options will be greyed out making it impossible for you to perform a new backup or restore.
Once the above is completed however, when you follow the steps below, a brand new backup/restore session will kick off allowing you to perform a new backup or restore.
Backup / Restore Process
If you HAVE done a backup or restore already, and have the same USBC thumbdrive you used for said backup, you can also simply follow the steps below:
- Open Settings on your device.
- Scroll down and tap System.
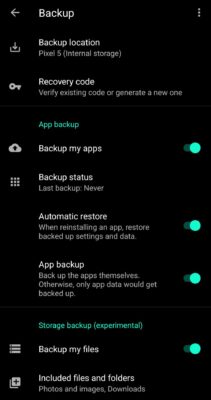
- Select Backup.
- Ensure you have already setup a Security PIN or Lock of some kind on your device or you will be asked to go back and do this only after you go through step 6 below!
- Here you will be presented with a 12-word recovery code… WRITE THIS DOWN AND DO NOT LOSE IT.
- Re-enter the 12-word recovery code.
- Choose a backup destination. You can back up to an external storage device like a USB drive, your local laptop or a cloud service (if you have one setup already on the device).
- Select the data you wish to back up (e.g., apps, settings, and files).
- Tap the vertical 3 dots on the top right of the screen and then tap “Backup now” to initiate the backup process.
Restoring Data:
To restore a backup:
- Go to Settings > System > Backup.
- Enter the 12-word recovery code.
- Select the location of the backup file you want to use to restore from.
- Tap Restore and select the backup you want to restore.
- Follow the on-screen instructions to restore your apps, settings, and files.
Pro Tip: You can choose to backup your device to the local device itself. Although not that useful in and of itself, if you do choose to do this, we highly recommend you then take the backup file created and follow the process in #2 below, so that you can save this backup file to your PC along with whatever files, pictures, contacts you may also want/need saved!
NOTE: Many people complain that the Seedvault backup process above has many issues and does not always work. We have found that this is, in fact, unfortunately the case. 90% of the time it does work just fine, and it may require you attempt to do the full backup or restore multiple times before it completes successfully.
GrapheneOS is working on creating their own improved version for a simpler and cleaner backup, however, this is not expected to be released for a few months.
As such, we highly recommend you ALSO, as a precaution, follow the Specific File(s) Backup process outlined below as well to ensure your critical files are backed up safely!
2. Specific File(s) Backup
Manual backups are also a great option as, unfortunately due to the nature of tech, sometimes the backup file you may have generated in the prior method simply will not restore everything you thought you had saved. With this in mind, you can back up important files, photos, and other data directly to an external storage device or a computer fairly simply.
What You Can Back Up:
- Photos and videos
- Documents and files (and contacts!)
- Text Messages and Phone Logs
Steps to Backup Photos, Videos, Documents, Files and Contacts:
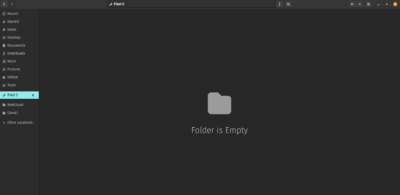
- Backup Files via USB:

Restoring Manual Backups:
- File Backup: To restore, simply copy the files back from your external storage to the desired location on your Pixel using the same process outlined above and HERE.
Steps to Backup Text Messages and Phone Logs:
Step 1: Install the SMS Backup & Restore App
- Download “SMS Backup & Restore” from F-Droid or Aurora Store
- Grant necessary permissions (SMS, Storage)
Step 2: Create Backup
- Open SMS Backup & Restore
- Tap “Backup”
- Choose what to include: SMS, MMS, Call logs
- Select “Local Backup” (not cloud options)
- Choose storage location (internal storage or SD card)
- Tap “Backup” – creates an XML file
Step 3: Locate Your Backup File
- File will be saved as
sms-[date].xmlin your chosen directory - Default location is usually
/storage/emulated/0/SMSBackupRestore/
Step 4: Transfer & Store
- Copy file to external storage, laptop, or secure server
- File can be transferred via USB, local network, or encrypted email
Restoring Messages to New GrapheneOS Device:
- Install same SMS Backup & Restore app
- Copy backup file to new device
- Open SMS Backup & Restore App → “Restore”
- Select your backup file
- Choose what to restore
- Confirm restoration
3. Cloud Storage Services
While Google’s cloud storage services are off the table, you can still use other cloud storage providers that prioritize privacy and security.
What You Can Back Up:
- Photos and videos
- Documents and files (and contacts!)
A Few Recommended Options:
- Paxmail.cc – A hosted cloud storage and email service (among a few other things).
- Nextcloud – A self-hosted cloud storage service that gives you full control over your data.
- Ente Photos – A privacy-focused cloud storage service for your photos.
Steps to Backup:
Each option available has different instructions on setup. Please refer to the documentation found on the individual websites to this extent. Of course, should you need help, we have our Personal Migration Support service available and General IT Support service available as well.
Troubleshooting
As issues come up with this process that are not already addressed above, we will post them here:

