Installing GrapheneOS on your Pixel Phone.
Learn how to install the most private and secure open source mobile operating system on your own phone!
What we do here at MARK37 with The Ghost Phone is really not all that complicated for anyone with the patience and determination to learn a new thing.
So much so my daughter, at age 13, was assisting me with the installation and setup of devices for nearly a year when we first got started. I can now give her a phone and she can get it loaded and ready to ship in 20 minutes.
She’s definitely a bright young lady, but I can assure you that if she can do it, so can you!
Step 1) Ensure you have a Pixel device
There are various other open source mobile operating systems you can install on other device types, however, GrapheneOS, which is the most private and secure option available in the market right now, only works on Pixel devices. There are a variety of reasons for this, but the short version is that Pixel devices are optimized for the open source Android operating system and also offer a few security and privacy features that other phones simply do not have available.
This means your Samsung phone you love could be de-googled, leveraging something like LineageOS, but it’s honestly not something we’re interested in assisting with, as we believe LineageOS is a far cry from the GrapheneOS operating system on numerous levels.
In fact, without major tweaking, LineageOS is essentially still Google Android Light.
Better than running straight Google Android? Sure… but why go through the hassle when there’s a much better option available that actually delivers the privacy and security you’re looking for in the first place?
All of this means you’re going to need to find, specifically, a Pixel device, that is OEM (Original Equipment Manufacturer) unlocked and will work on the carrier you’re wanting to use. This is honestly the hardest of all the steps, as finding a Pixel phone that is truly both carrier unlocked (available to work on any network) and OEM unlocked (available to have the operating system replaced) can be extremely difficult.
In fact, we used to offer a service whereby we would de-google your phone and install GrapheneOS for you, similar to our Linux Install Service, but nearly 90% of the time customers would send us phones from Walmart, Best Buy, ebay or Swappa that were carrier unlocked but not OEM unlocked. So much time and money spent shipping devices back and forth only to find it wasn’t even capable of being “de-googled”!
Step 2) Ensure your device is DEFINITELY “OEM Unlocked” or “Factory Unlocked”
If you’ve already done this step, skip to Step 3.
When looking online you’ll often see items for sale that have descriptions like:

“Unlocked” in this case, however, is referring to the device being “Carrier Unlocked”, which allows the user to activate the phone on any major network provider in the USA.
Some sellers are getting smarter and referring to the device as “Factory Unlocked”, which does, in fact, mean you can remove the stock Google Android operating system and replace it with something different. This, obviously, is what we need.
Despite this, we’ve found that nearly 50% of the phones being sold as “Factory Unlocked” are in fact not, once we receive them and test them. Unfortunately, this is the case even when we reach out ahead of time to the seller to confirm that the device is or is not OEM Unlocked.
It took us months to find, and then educate, a willing supplier who would do this testing prior to listing inventory for us to pull from.
If you’d prefer to just purchase a device from us that you KNOW is OEM Unlocked and can be de-googled, reach out to support@mark37.com and we’d be happy to sell you one at cost + a very small markup + shipping. We do this a few times a month, in fact, for customers already.
Note: All Pixel Tablets are already OEM Unlocked by default.
How to Check
- Ensure your device is connected to the internet via WiFi or a direct connection using a usbc to ethernet adapter.
- Within your Google Android Settings, go to Settings > About Phone > Build Number (on very bottom) > tap Build Number 7 times quickly. This will put the device into “developer mode” and allow you to check for the specific “OEM Unlocking” setting we’re looking for.
- Go back to Settings > System > Developer Options > scroll down a little and you’ll see “OEM Unlocking” with a toggle. This will either be grayed out or allow you to turn it on/off.
- If you are unable to toggle this on, unfortunately there’s no “hack” to convert the device at this time that we are aware of.
- If you CAN toggle this on, this means your device is OEM Unlockable and you’ll need to keep this turned on before going to the next step.
Step 3) Load GrapheneOS
As noted in the prior step, you’ll need the device to have “OEM Unlocking” turned on. If you have not done this yet, please refer to “How to Check” in Step 2) and get this done.
Put device into fastboot mode by restarting it and holding the volume down button while it is restarting.
The easiest way to load GrapheneOS onto your Pixel phone is via the “web installer” method and to connect your phone to another mobile phone, ideally via a usbc – usbc cord (or usbc to lightning if you have an iPhone) that has data transfer capabilities. You can load GrapheneOS onto Device A via your laptop as well; however, it involves a little more complicated of a process.
A detailed explanation of the various ways you can load GrapheneOS can be found on their website HERE.
Note: If you’d prefer to watch a video of someone going through this whole process, there are numerous video guides found HERE.
Note: Not all charging cords have data transfer capabilities. If you find you cannot get the devices to recognize one another, this is likely why!
From here on out we’ll refer to the Pixel device you’re wanting to load GrapheneOS onto as “Device A” and the phone you’ll be loading GrapheneOS from as “Device B”.
This website, https://grapheneos.org/install/web, is also where you need to go to perform the install of GrapheneOS onto your device, so open your browser on Device B and go to there now.
Once there, scroll down the page until you see the following:
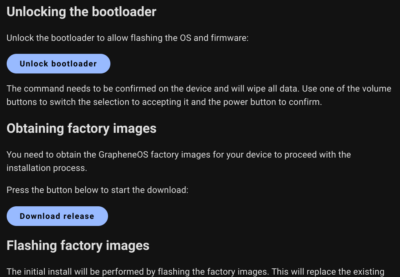
Tap on “Unlock bootloader” to start the process and follow the prompts.
You’ll be flipping back and forth between the 2 devices allowing access to the device as it reboots itself a few times, so stay near both devices.
Step 4) Tweak Settings
Once GrapheneOS is loaded you may want to tweak the settings of the device so that it is simpler for you to use. I highly recommend reviewing the videos and tutorials found in our Getting Started w/ Your Ghost Phone Guide HERE.
Step 5) Load F-Droid and Aurora
From the stock browser application “Vanadium”, you can go to www.f-droid.org and install the F-Droid application by simply tapping on the “Download F-Droid” tab on their homepage.
Once F-Droid is installed, open the app and then search for and download the “Aurora” app.
With these 2 app stores installed on your device you can then go through the list of apps we pre-load on the device and choose to install those you feel you’ll need… or any other app! To learn more about what apps work, and which do not, check out our article HERE.